1. Setup Your Pi

Let’s begin by setting up the Pi. The Raspberry Pi 3 board includes -

  • 4 USB ports
  • HDMI port for video output (you’ll be using this to connect to your HDMI monitor)
  • 3.5mm audio jack for sound output (you’ll be using to connect your earphones)
  • Micro SD card slot
  • Ethernet port

Assembling Your Pi

  1. Insert Pi into the included case.
  2. Insert your micro SD card into the micro SD card slot on your Pi.
  3. Plug in the USB microphone and headphones.
  4. Connect the keyboard and mouse to the USB ports.
  5. Connect your monitor using the HDMI port.
  6. Connect the Ethernet Cable

Booting Your Pi

  1. Connect to the power supply.
  2. If you’re prompted to login - use these credentials:
    • Username: pi
    • Password: raspberry

Checkpoint 1

  1. Make sure you’re connected to the internet and are able to navigate to https://developer.amazon.com.

2. Get an Amazon Dev Account

Register for an Amazon Developer Account

Unless you already have one, go ahead and create a free developer account at developer.amazon.com. You should review the AVS Terms and Agreements here.

Checkpoint 2

  1. Login and navigate to https://developer.amazon.com/edw/home.html

3. Create a Device & Security Profile

Register Your Product and Create a Security Profile

After you’ve registered for an Amazon developer account, you’ll need to create an Alexa device and security profile. Make note of the following parameters ProductID (also known as Device Type ID), ClientID, and ClientSecret – you’ll need these while setting up the project.

  1. Login to Amazon Developer Portal - developer.amazon.com
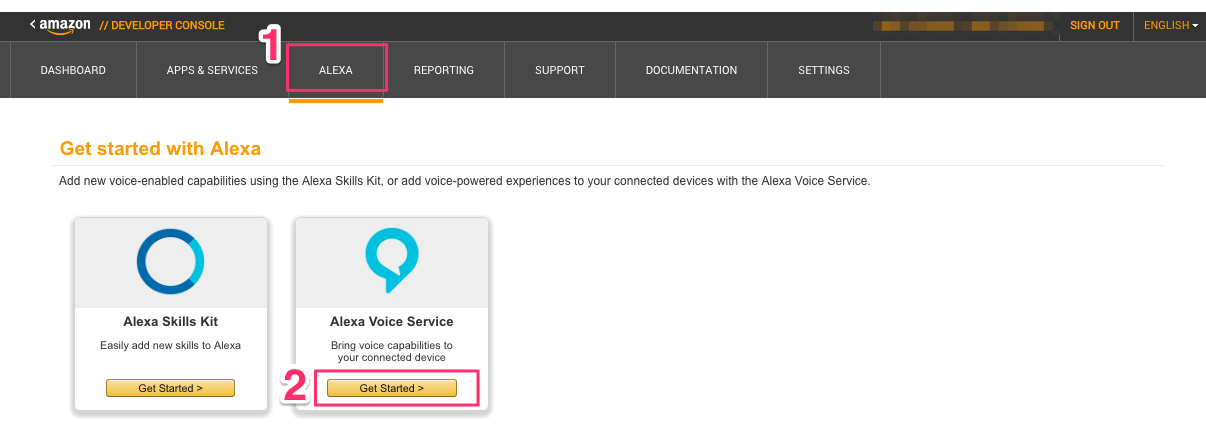
  2. Click on Apps & Services tab -> Alexa -> Alexa Voice Service -> Get Started
  3. In the Register a Product Type menu, select Device.

Device Type Info (Left Nav)

  1. Device Type ID: provide a simple identifier for your product. No spaces.
  2. Display Name: the display name in the developer portal, as well as the name that will be provided to your users when they register the product with Amazon.
  3. Click Next

Security Profile (Left Nav)

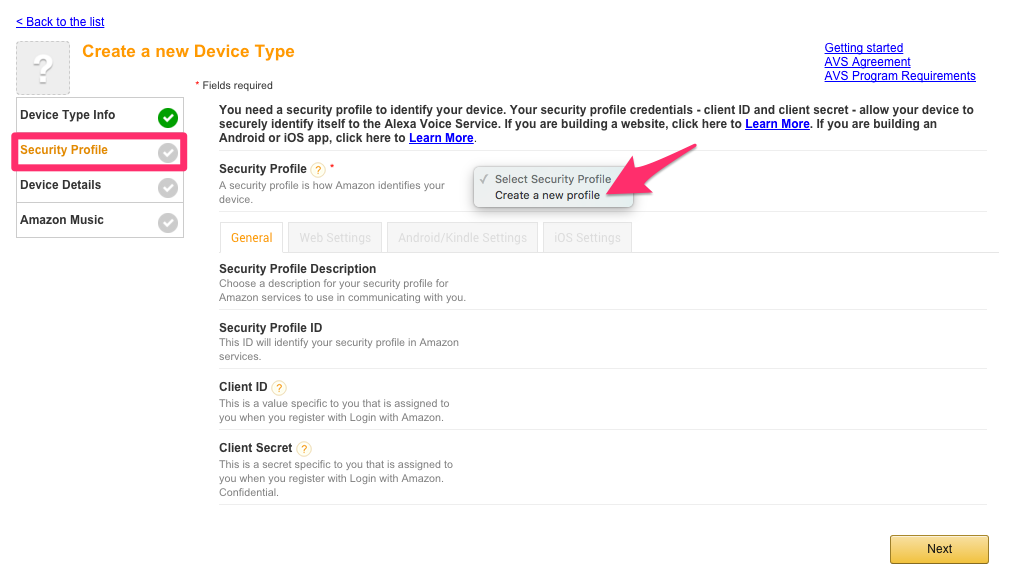
  1. Click on the Security Profile drop down and choose Create a new profile

  2. From the General Tab enter the following:
    • Security Profile Name: Alexa Voice Service Sample App Security Profile
    • Security Profile Description: Alexa Voice Service Sample App Security Profile Description
    • Click Next.

    Note: These are suggested values. You provide custom information for Security Profile Name and Security Profile Description.

    Client ID and Client Secret will be generated for you.

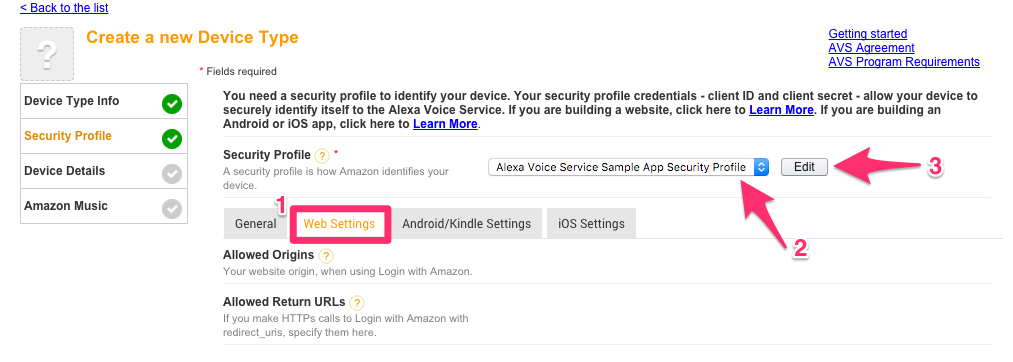
  3. Now click on the Web Settings Tab.
    • Make sure the security profile you just created is selected in the drop-down menu, then click the Edit button.
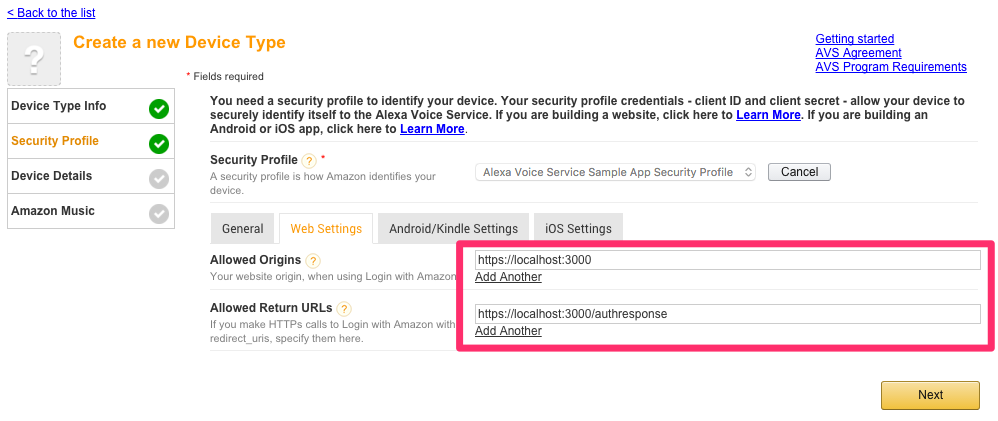
    • Allowed Origins: Click “Add Another” and then enter https://localhost:3000 in the text field that appears.
    • Allowed Return URLs: Click “Add Another” and then enter https://localhost:3000/authresponse in the text field that appears.
    • Click Next.

Device Details (Left Nav)

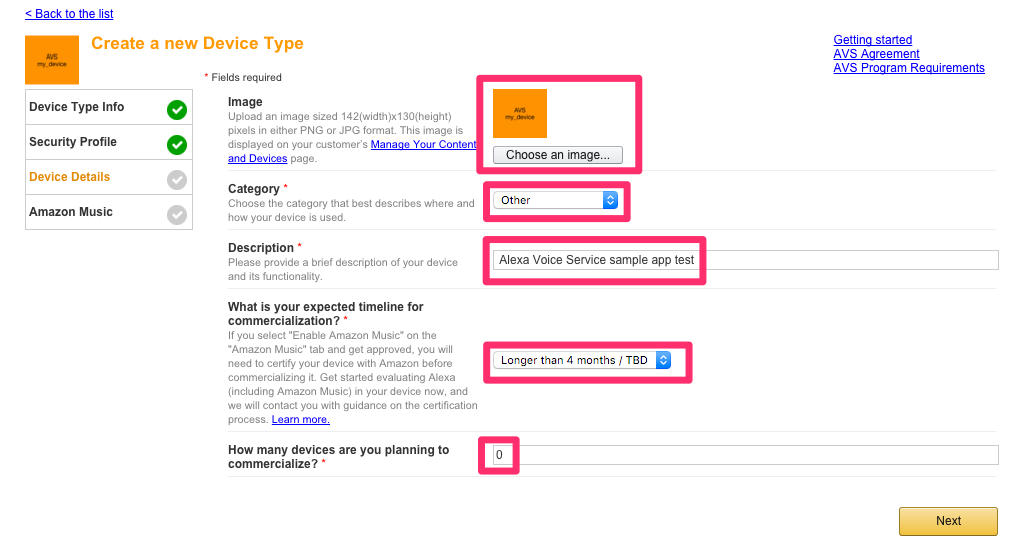
  1. Image: Right click on this link to save this test image to your computer (or use your own), then upload it:
    https://developer.amazon.com/public/binaries/content/gallery/developerportalpublic/solutions/alexa/alexa-voice-service/images/reference-implementation-image.png
  2. Category: Other
  3. Description: Alexa Voice Service sample app test
  4. What is your expected timeline for commercialization?: Longer than 4 months / TBD
  5. How many devices are you planning to commercialize?: 0
  6. Click Next.

Amazon Music (Left Nav)

  1. Select No and click the Submit button.

Checkpoint 3

  1. Ensure that your device is now listed in the AVS dashboard https://developer.amazon.com/edw/home.html#/avs/list
  2. Click the Edit button next to your device in the AVS dashboard. Navigate to Security Profile > Web Settings and ensure that you’ve set your Allowed Origins and Allowed Return URLs.

4. Enable Your Security Profile

  1. Open a web browser, and visit https://developer.amazon.com/lwa/sp/overview.html.

  2. Near the top of the page, select the security profile you created earlier from the drop down menu and click Confirm.
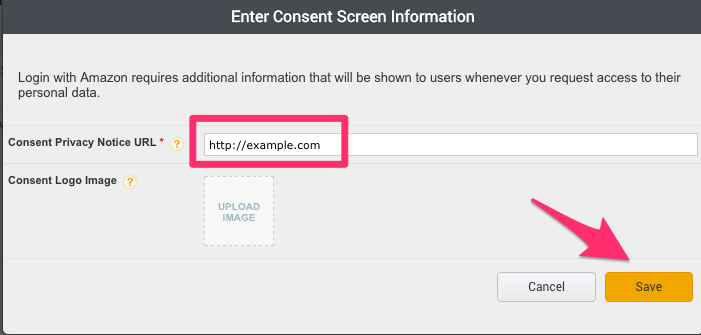
  3. Enter a privacy policy URL beginning with http:// or https://. For this example, you can enter a fake URL such as http://example.com.
  4. [Optional] You may upload an image as well. The image will be shown on the Login with Amazon consent page to give your users context.
  5. Click Save.

Checkpoint 4

  1. Ensure that you security profile appears under Login with Amazon Configurations.

5. Copy Your Credentials

  1. Navigate back to the AVS dashboard: https://developer.amazon.com/edw/home.html#/avs/list.
  2. Click Edit. From Device Type Info copy your Device Type ID (also referred to as Product ID).
  3. Select Security Profile from the left nav and copy your Client ID and Client Secret.

Checkpoint 5

  1. Make sure you’ve copied your Device Type ID, Client ID and Client Secret to a text file on your Pi (we recommend placing it on your Desktop).

6. Run the Install Script

Update the Install Script with Your Credentials

We are now ready to run the install script, but before we do that we need to make some adjustments to the script.

First, from the Desktop open the alexa-avs-sample-app folder. Then right-click on automated_install.sh and select Text Editor. In your text editor, select Options from the top nav and enable Line Numbers.

Now that you’ve got the script open in text editor, we need to enter your credentials. Paste the values for ProductID, ClientID and ClientSecret with your credentials that you copied in the previous step.

Your updates should look something like this:

  • ProductID="RaspberryPi3"
  • ClientID="amzn.xxxxx.xxxxxxxxx"
  • ClientSecret="4e8cb14xxxxxxxxxxxxxxxxxxxxxxxxxxxxx6b4f9"

Last, you’ll need to comment out lines 403 through 409. Your file should look exactly like this:

# Install dependencies
# echo "========== Update Aptitude ==========="
# sudo apt-get update
# sudo apt-get upgrade -y

# echo "========== Installing Git ============"
# sudo apt-get install -y git

Run the Install Script

You are now ready to run the install script. This will install all dependencies, including the two wake word engines from Sensory and KITT.AI.

To run the script, open terminal and navigate to the folder where the project was cloned. Then run the following command:

cd ~/Desktop/alexa-avs-sample-app && . automated_install.sh

Checkpoint 6

You’ll be prompted to answer a few simple questions. These help to ensure that you’ve completed all necessary prerequisites before continuing.

For this workshop, you’ll need to:

  1. Agree to AVS Terms and Conditions
  2. Confirm you have an Amazon developer account
  3. Validate that your Product ID, Client ID, and Client Secret are accurate
  4. Type Y when asked for audio output, to choose 3.5mm audio jack
  5. Type Y when asked to enable Alexa wake word detection

7. Launch the Companion Service

Terminal Window 1

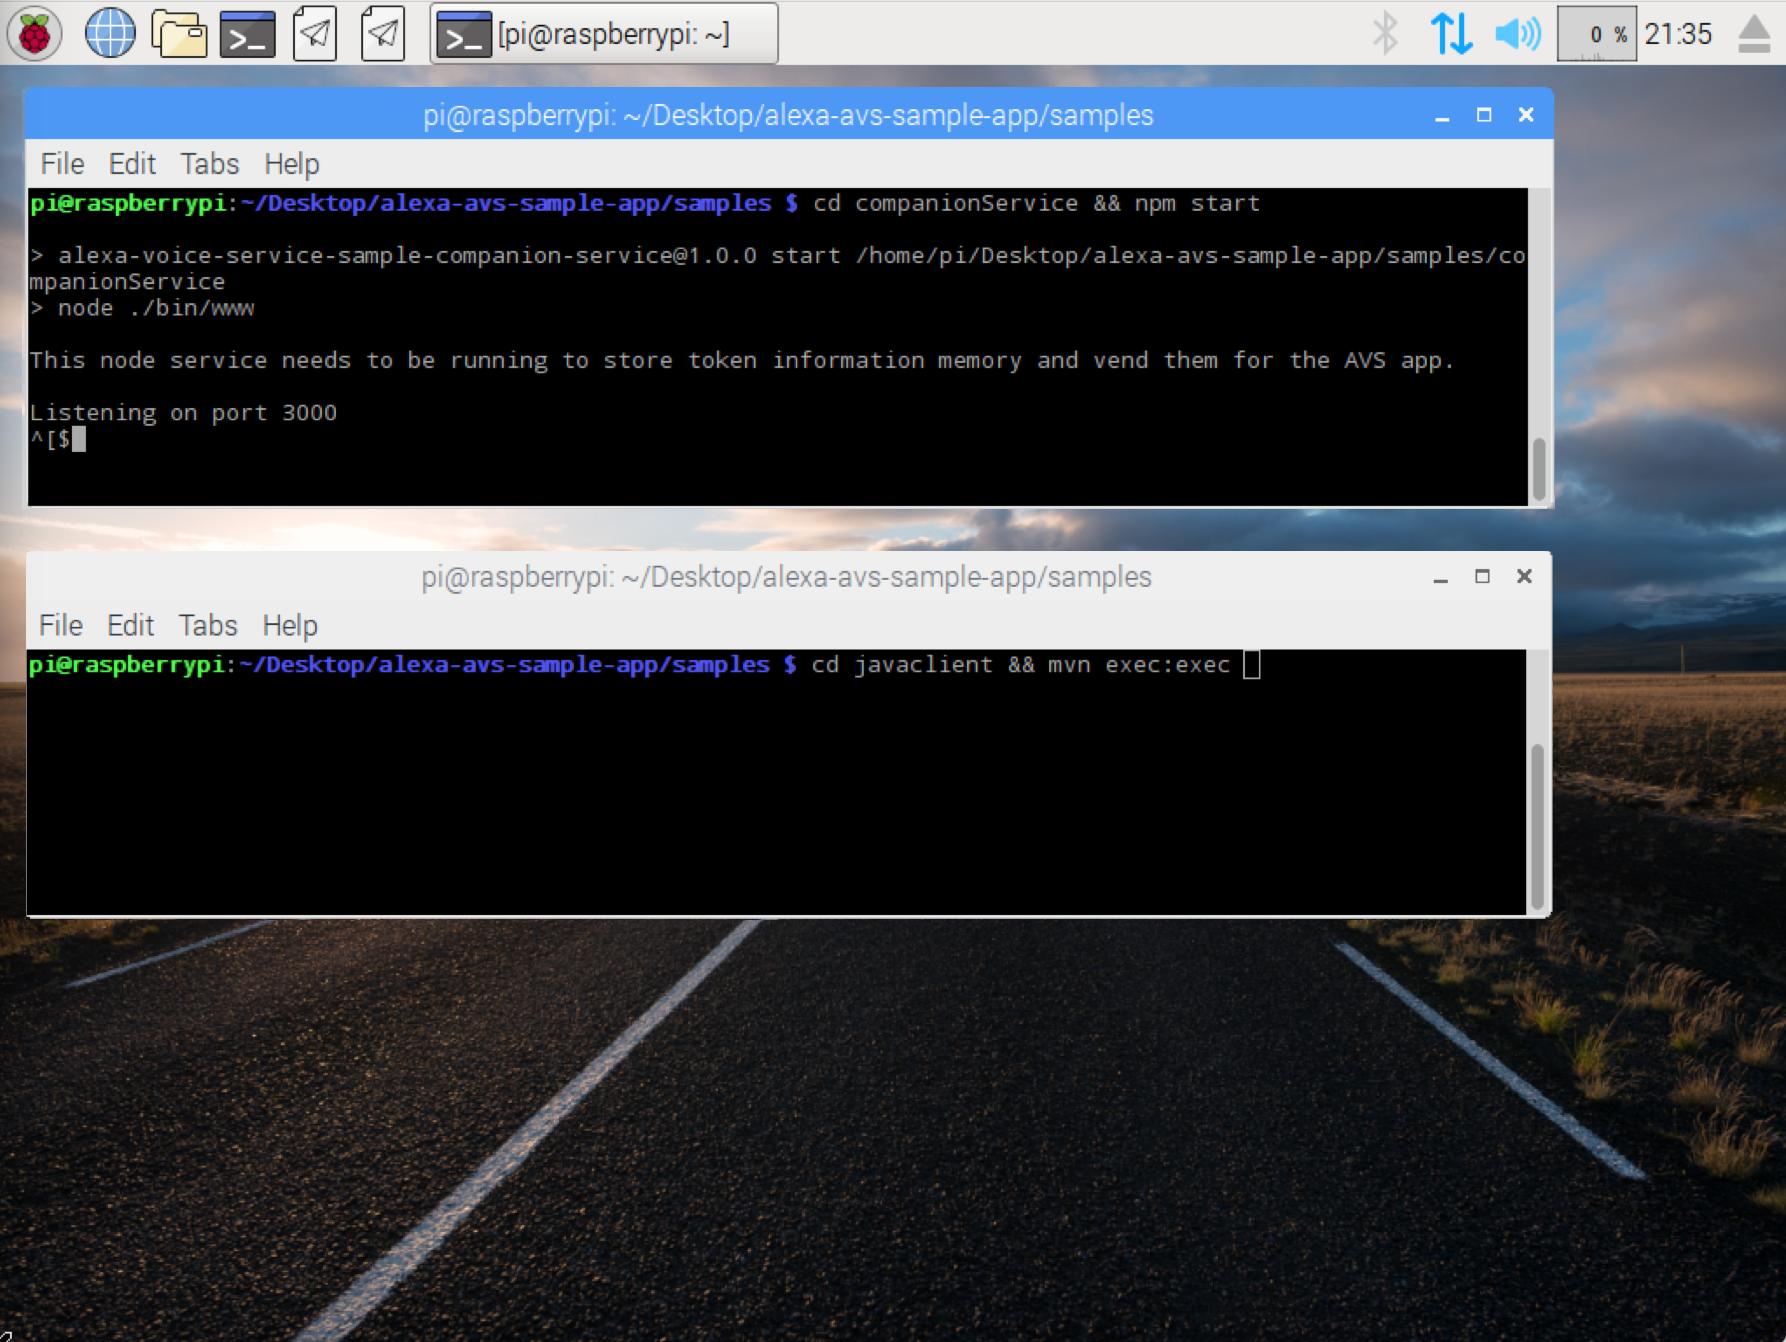
Open a new terminal window and type the following commands to bring up the web service which is used to authorize your sample app with AVS:

cd ~/Desktop/alexa-avs-sample-app/samples/companionService && npm start

The server is now running on port 3000 and you are ready to start the client.

See API Overview > Authorization to learn more about authorization.

Checkpoint 7

  1. Ensure that your web service is listening on port 3000.

8. Launch the Client

Terminal Window 2

Open a new terminal window and type the following commands to run the sample app, which communicates with AVS:

cd ~/Desktop/alexa-avs-sample-app/samples/javaclient && mvn exec:exec

Let’s walk through the next few steps relevant to Window 2.

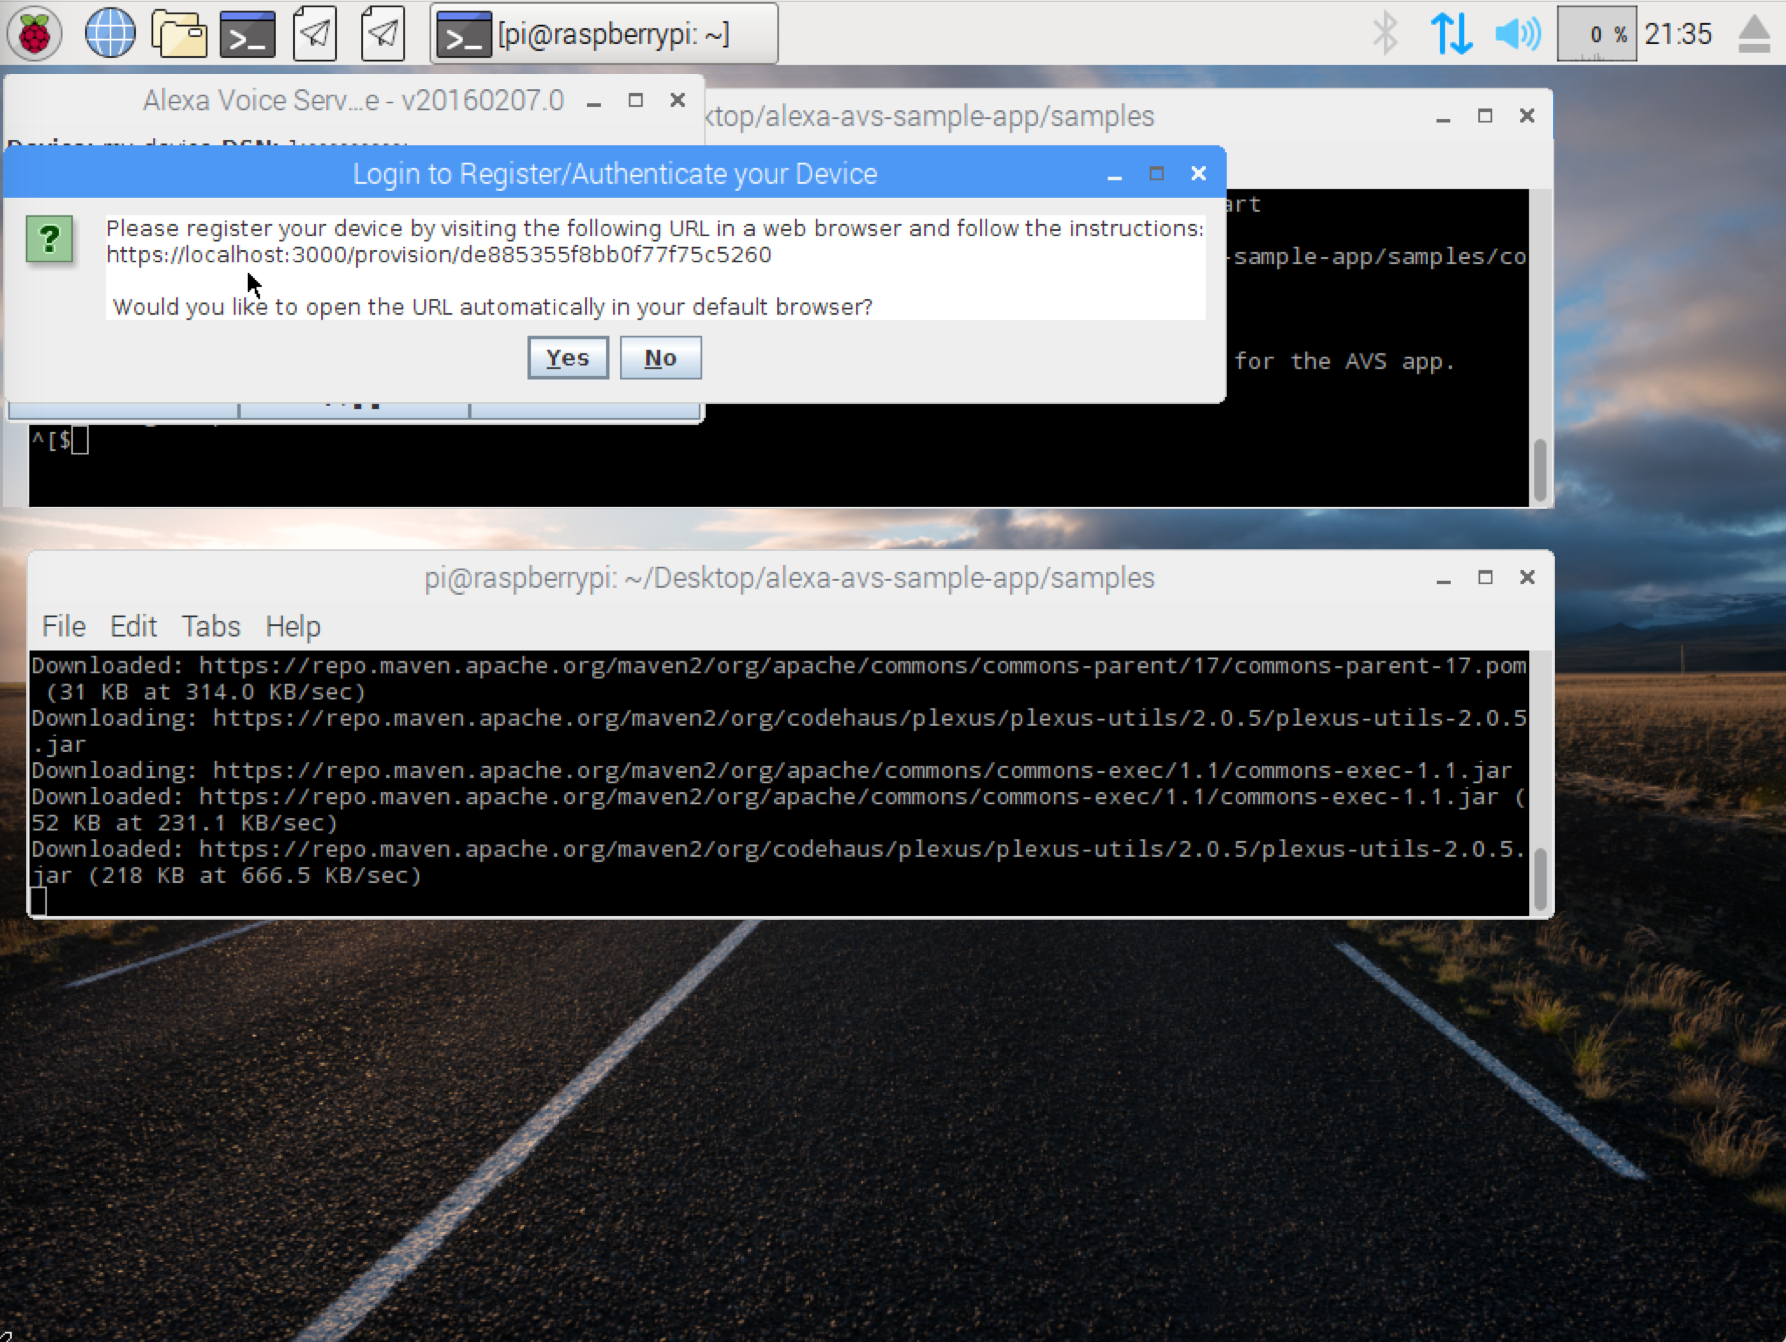
  1. When you run the client, a window should pop up with a message that says -

    Please register your device by visiting the following URL in a web browser and following the instructions: https://localhost:3000/provision/d340f629bd685deeff28a917. Would you like to open the URL automatically in your default browser?

    Click on “Yes” to open the URL in your default browser.

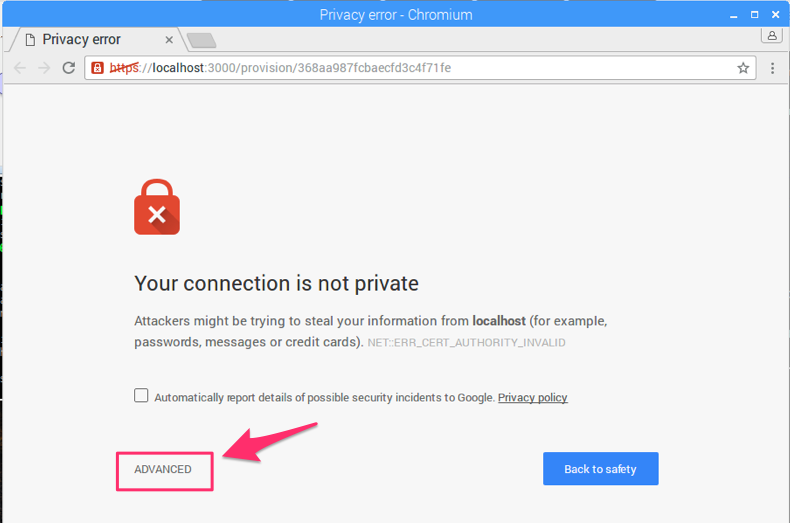
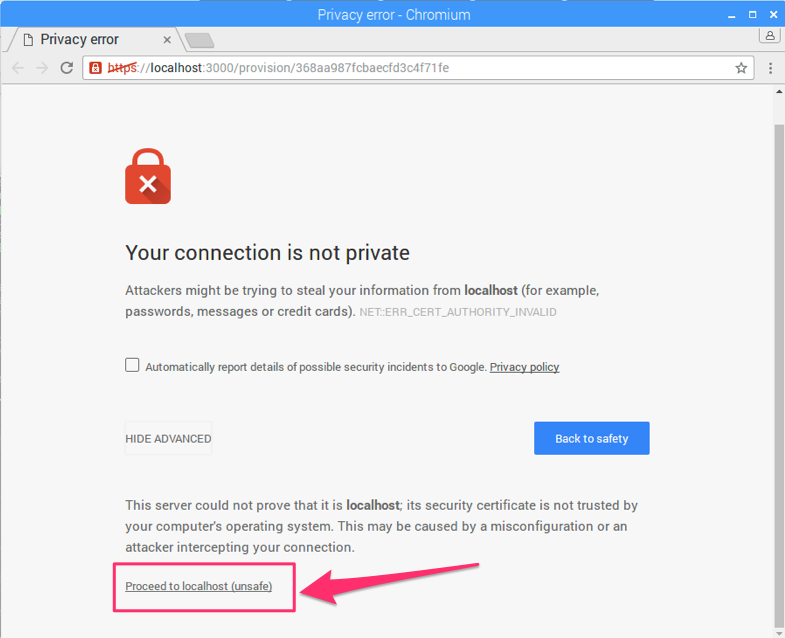
  2. If you’re running Raspbian Jessie with Pixel desktop (and with Chromium browser), you may get a warning from the browser. You can get around it by clicking on Advanced -> Proceed to localhost(unsafe).

  3. You’ll be taken to a Login with Amazon web page. Enter your Amazon credentials.

  4. You’ll be taken to a Dev Authorization page, confirming that you’d like your device to access the Security Profile created earlier.

    Click Okay.

  5. You will now be redirected to a URL beginning with https://localhost:3000/authresponse followed by a query string. The body of the web page will say device tokens ready.

  6. Return to the Java application and click the OK button. The client is now ready to accept Alexa requests.

Checkpoint 8

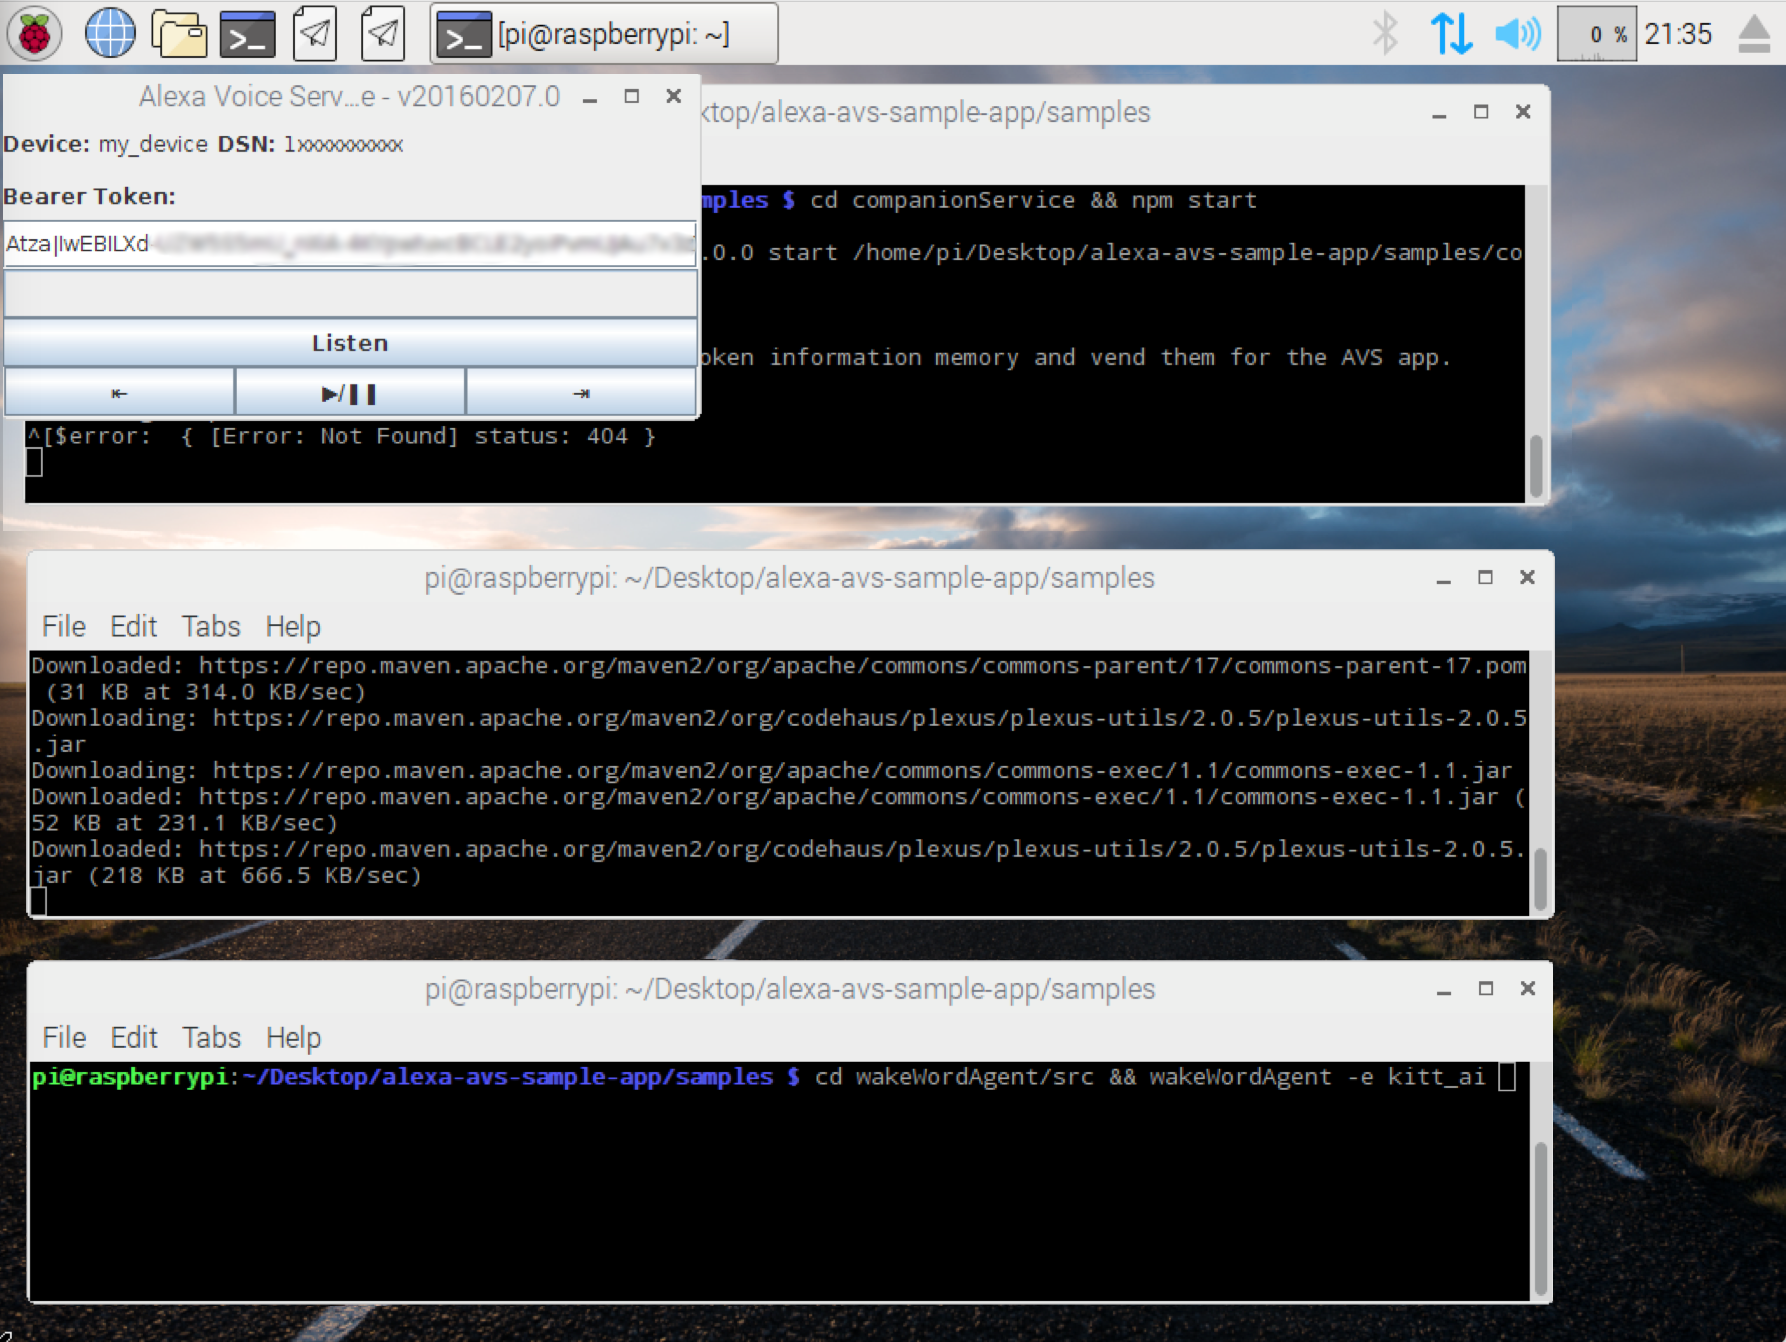
  1. Ensure that the client displays a Bearer Token
  2. Use the Listen button to test push-to-talk functionality. After the tone, ask Alexa, “What’s the weather in Las Vegas?” If Alexa responds you’re ready to move on to the next step.

9. Launch the Wake Word Engine

Terminal Window 3

This project supports two third-party wake word engines: Sensory’s TrulyHandsFree and KITT.AI’s Snowboy. The -e option is used to select the agent and supports two values for engine: kitt_ai and sensory.

Open a new terminal window and use the following commands to bring up a wake word engine from Sensory or KITT.AI. The wake word engine will allow you to initiate interactions using the phrase “Alexa”.

To use the Sensory wake word engine, type -

cd ~/Desktop/alexa-avs-sample-app/samples
cd wakeWordAgent/src && ./wakeWordAgent -e sensory

or type this to use KITT.AI’s wake word engine -

cd ~/Desktop/alexa-avs-sample-app/samples
cd wakeWordAgent/src && ./wakeWordAgent -e kitt_ai

Now you have a working hands-free AVS prototype!

Checkpoint 9

  1. Say “Alexa”. Wait for the tone, then say “tell me a joke.” If Alexa responds, you have a working prototype.

10. Talk to Alexa

Let’s Interact with Your Prototype

You can now talk to your Pi by simply saying the wake word “Alexa”. Try the following -

  • Say “Alexa”, then wait for the beep. Now ask “What time is it?”
  • Say “Alexa”, then wait for the beep. Now ask “What’s the weather in Las Vegas?”
  • Say “Alexa”, then wait for the beep. Now say “Set a timer for 5 seconds.”
  • Say “Alexa”, then wait for the beep. Now say “Play Z100.”
  • Say “Alexa”, then wait for the beep. Now say “Good afternoon.”
  • Say “Alexa”, then wait for the beep. Now say “Tell me a joke?”
  • Say “Alexa”, then wait for the beep. Now ask “What’s the meaning of life?”
  • Say “Alexa”, then wait for the beep. Now say “Sing happy birthday.”
  • Say “Alexa”, then wait for the beep. Now ask “What day of the week does Christmas fall on?”
  • Say “Alexa”, then wait for the beep. Now ask “Where were you born?”
  • Say “Alexa”, then wait for the beep. Now ask “Can you rap?”

Explore more skills

Now, let’s enable some skills. Open the Amazon Alexa app on your phone or head over to https://alexa.amazon.com. Click Skills. Poke around, find something you like and follow the instructions. Make sure to enable more than one.

Look ma, no more checkpoints!

Extra Credit

Connect remotely using VNC

Now that you’ve got your AVS prototype running, you may want to get rid of the monitor, keyboard and mouse. You can do that by using SSH and VNC. Follow the instructions here to setup SSH and VNC.

SSH allows you to remotely access the command line of your Raspberry Pi from another computer (as long as they are both on the same network). This removes the requirement to have an external monitor connected to your Pi.

VNC is a graphical desktop sharing system that will allow you to remotely control the desktop interface of your Raspberry Pi from another computer. This will come in very handy as you get rid of the external monitor connected to your Pi.


SSH into the Raspberry Pi

NOTE SSH is enabled by default on Raspbian Jessie. If you run into problems getting SSH to work, make sure it’s enabled. This is done using the raspi-config utility.

So, let’s SSH into your Raspberry Pi. To do that, you need to know the IP address of your Raspberry Pi.

Type this command into the terminal:

hostname -I
> 192.168.1.10 //this is an example Raspberry Pi’s IP - it would be different for you

If you’re on a Windows PC, follow the instructions here to SSH Using windows

Now that you know the IP address of your Pi, you are ready to connect to it remotely using SSH. To do this, open the terminal utility on the computer you would like to connect from and type the following:

ssh pi@<YOUR Raspberry Pi IP ADDRESS>

It will prompt you for your password. NOTE: the default password for the user pi is raspberry

Voila! You’re remotely connected to your Raspberry Pi. Now you can install all the utilities while connected remotely via SSH.


Install VNC Server

Open Terminal, and type:

sudo apt-get install tightvncserver

Start VNC Server

To start VNC Server, type:

tightvncserver

You’ll be asked to set a password to access the Pi. You’ll need this when you try to access the Pi from another computer, which we will be doing in a moment.

Run VNCServer at Startup

You want to make sure the VNC Server runs automatically after the Raspberry Pi reboots, so you don’t have to manually start it each time with the command tightvncserver through SSH. To do that, type the following in the terminal:

cd /home/pi
cd .config

Note the ‘.’ at the start of the folder name. This makes it a hidden folder that will not show up when you type ‘ls’.

mkdir autostart
cd autostart

Create a new configuration by typing the following command:

nano tightvnc.desktop

Edit the contents of the file with the following text:

[Desktop Entry]
Type=Application
Name=TightVNC
Exec=vncserver :1
StartupNotify=false

Type ctrl-X and then Y, and then press Enter to save the changes to the file.

That’s it. The next time you reboot, the VNC server will restart automatically.

Connecting to Raspberry Pi via VNC

Please download VNC viewer (available for Mac, Linux, Windows, and more), and follow the instructions to connect to your Pi over VNC.

You may now disconnect the Monitor, keyboard and mouse (if you like). Now with SSH (allows remote access to the terminal) and VNC (allows you to remote control the Raspberry Pi’s desktop interface) installed, the external monitor is optional. Feel free to disconnect it from the Raspberry Pi.
Amazon Resouces

Alexa Resources

Wake Word Engines